
Official manual · chapter 10
VRROOM Web Server CONFIG Section
Original text and images from the official 8K VRROOM User Manual (Rev 1.00), pages 36–39. Click or tap the screenshot to enlarge it.
The CONFIG section
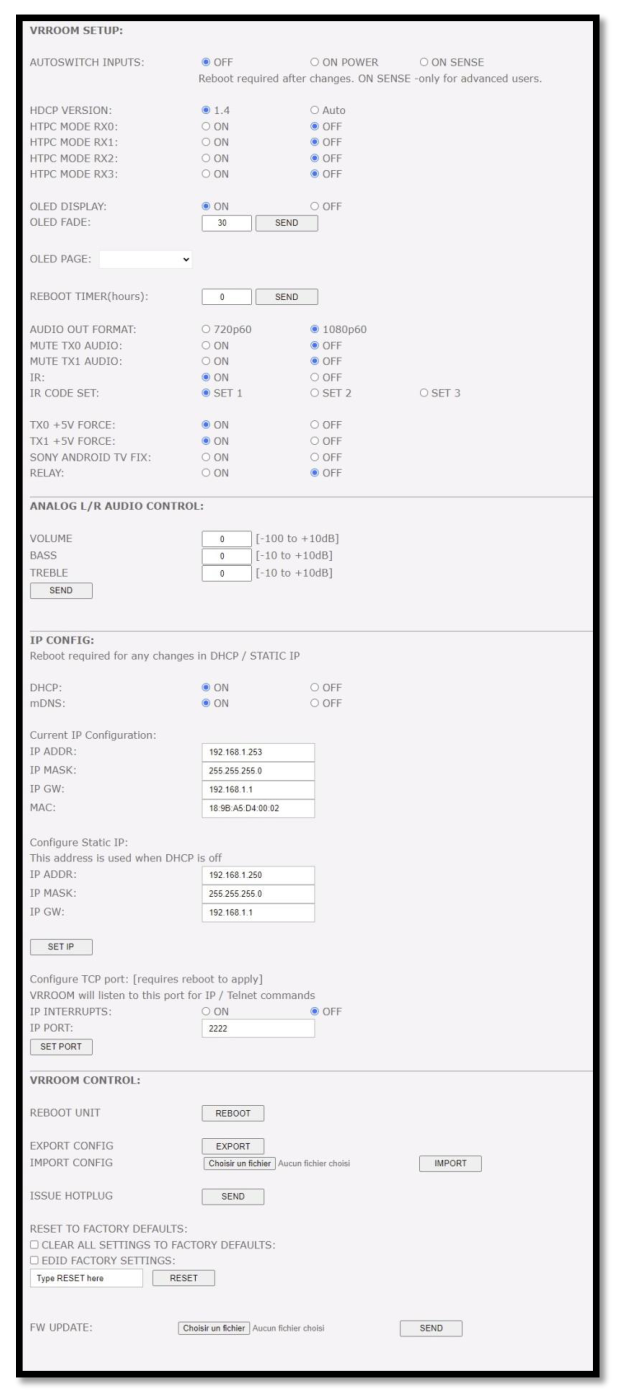
[AUTOSWITCH INPUTS]: Select between OFF (Manual Switching), ON POWER or ON SENSE. ON POWER rely on +5V detection while ON SENSE will allow the TMDS / Pixel clock Auto switch feature and force the VRROOM unit to automatically switch to the active signal if the selected signal is lost. This mode allows auto switching of source that keep sending +5V when in standby such as ATV4K, X1X, Shield and others. PLEASE NOTE THAT AUTOSWITCH IS NOT YET AVAILABLE, NEW FIRMWARE UPDATE NEEDED.
[HDCP VERSION]: Allow you to select/force the HDCP revision of the TX1 Output Port.
[HTPC MODE]: Set HTPC mode ON/OFF individually for each input. Useful if you have trouble with Windows and icons when turning your secondary display off or resuming from stand-by mode. Please note that HTPC mode is not compatible with HDCP signal.
[OLED DISPLAY]: Enabled by default, VRROOM OLED display can be turned ON/OFF at will. Some users might find the VRROOM OLED display visually disturbing in their HT setup. You have the possibility to turn it off.
[OLED FADE]: Allow you to define a custom timing in seconds before OLED FADE, set it to 0 for OLED to always stay active. Default is 30sec.
[ROTATE 180 DEG]: OFF by default, based on your setup, you might prefer to flip the OLED display, once activated, this option will flip the VRROOM OLED.
[REVERSE COLORS]: OFF by default, once activated this option will reverse the VRROOM OLED colors.
[OLED PAGE]: Select the OLED page that will be displayed at startup.
[REBOOT TIMER]: If you meet startup issue after your system was idle for a while (overnight or a couple of days off) you can define a timer in hours that will force a reboot of the VRROOM unit every X hours after your system was last turned off.
[AUDIO OUT FORMAT]: You can set the video format of the HDMI self-generated video stream for the HDMI AUDIO OUT. If your sound system is only support up to 1080i as max signal, set the format to 720p60.
[MUTE TX0 AUDIO]: If you use an AVR at HDMI audio out, you might want to disable sound going to equipment connected at TX0 output. Here you can mute the TX0 output sound.
[MUTE TX1 AUDIO]: If you use an AVR at HDMI audio out, you might want to disable sound going to equipment connected at TX1 output. Here you can mute the TX1 output sound.
[IR]: Turn ON/OFF the ability of the VRROOM unit to be controlled by Infra-Red.
[IR CODE SET]: 3 different IR code set can be selected in case there is IR conflict with existing equipment in your setup.
[TX0 +5V FORCE]: ON by default, when set to OFF, the display at TX0 output will not be detected or seen by VRROOM similarly as it would be if the HDMI cable was physically disconnected.
[TX1 +5V FORCE]: ON by default, when set to OFF, the display at TX1 output will not be detected or seen by VRROOM similarly as it would be if the HDMI cable was physically disconnected.
[RELAY]: OFF by default, when set to ON, VRROOM can be used to trigger other equipment in your Home Theater system such as your projection screen for example.
[ANALOG L/R AUDIO CONTROL]: This section offer Volume, Bass and Treble control for the Analog Stereo output.
[SEND]: After Volume, Bass or Treble values changes, click send to apply your changes.
[IP CONFIG]: This section allows you to edit the way VRROOM will retrieve its IP address. Any changes will only be applied after reboot (power cycle)
[DHCP]: When set to ON, VRROOM will retrieve a dynamic IP automatically.
[mDNS]: When set to ON, VRROOM will offer a simple URL shortcut to always be reachable from
a browser. Ex: http://VRROOM-xx.local
[CURRENT IP CONFIGURATION]: Display the current value of IP address, IP mask and IP gateway and MAC.
[CONFIGURE STATIC IP]: Enter the IP address, IP mask and IP gateway of your choice for a static IP setup, DHCP needs to be OFF for using static IP values
[SET IP]: After any changes in IP configuration, click SET IP to validate.
[IP INTERRUPTS]: Some control system might need IP INTERRUPTS set to ON, Default is OFF.
[IP PORT]: Set the IP/telnet port of your choice here (default value is 2222).
[SET PORT]: Click here to apply the IP/telnet port of your choice (Reboot or Power cycle required)
[REBOOT UNIT]: Click REBOOT button to restart VRROOM completely.
[EXPORT CONFIG]: Allow you to export a txt file that includes the full list of VRROOM settings and some setup information that can be useful for support.
[IMPORT CONFIG]: If you previously exported your unit configuration file, you can restore it by selecting the filename and then clicking IMPORT. This can be useful after a firmware update to restore your previous working configuration.
[ISSUE HOTPLUG]: Click Send button to perform a soft-reset in your setup.
[RESET TO FACTORY DEFAULTS]: Type RESET in the factory def text field and click the available RESET button to clear all settings to factory defaults. VRROOM power cycle needed.
[EDID FACTORY SETTINGS]: Click the available check box to clear all EDID settings to factory defaults and type RESET in the text field. Finally click the RESET button and unit EDID will be reset to factory defaults.
[FW UPDATE]: Select the VRROOM firmware file and click SEND to upload it. Wait for VRROOM to reboot automatically, once VRROOM is rebooted, refresh the webserver page.
[REFRESH]: Refresh the current page.